Sunday, December 4, 2016

Build A Hard Dodger, Cabin Extension, Pilothouse - Preparing For Roof Installation

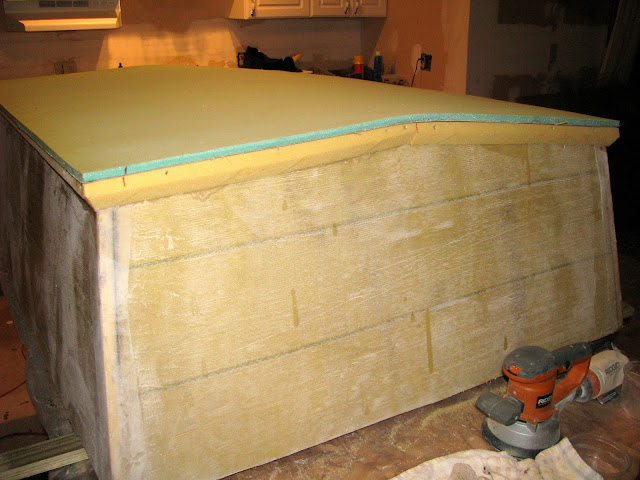
With the framing finished except for taping some joints on the inside, preparation began for installing the roof panel.

The best way to determine which panel -  6mm or 1/2" - to use was to install the glass tri-axial on one side of each.  While this doesn't give the ultimate strength or stiffness, it does give you an idea of how flexible the finished panel may be.  The 1/2" won the contest.

This was not the same material as that used for everything else, but marine grade PVC that was suitable.

To begin the roof, I applied the  36 ounce triaxial fabric and epoxy resin to one side of the 1/2".  Once the framing and trim was ready for the roof panel, having the glass on one side only made it easy to fit the curvature and, once the panel was attached to the frame with epoxy, the glass could be applied to the roof skin.
To make the rake and gutter trim for the roof - which also provided additional bonding area for the roof -  2" wide strips were ripped on the radial saw and then bevelled with a 45.  These were attached with thickened epoxy and temporary screws.


An additional roof rib was bonded to the inside of the front panel so there would be a horizontal surface below that would line up with the bottom of the other ribs and allow attachment of the headliner/modesty panel to hide all wiring.
With a liberal coating of thickened epoxy applied to the tops of the roof ribs, front, sides and rake and gutter trim, the roof is set in place and secured with screws to await epoxy curing.  The roof panel is made about 1/4" too large in all directions to allow it to be trimmed flush with the trim.


Friday, December 2, 2016

Build A Hard Dodger, Cabin Extension, Pilothouse - Getting Started With The Cabin Extension

As part of this project to convert an older Cal 25 as a dedicated (outboard only, no sailing gear) power boat, I wanted to build a cabin extension and then add a hard dodger as a separate piece to yield a completely weather tight living space and enclosed cockpit.

As background, the Cal 25 was made with a hard pop-top which provided a weather shield when lowered and standing headroom in the main saloon when raised.  As such, it really wasn't very practical since it offered no forward visibility when raised and made its use usually restricted to in-slip or on a mooring.
I wanted it to be long enough to go to the forward edge of the large cabin top opening and, since I was not going to ever use the mast on this boat, possibly go all the way to the aft edge of the hatch.  This would offer some additional cabin storage.  I wanted it to be wide enough to still allow easy access forward but some additional dry space along the sides as well.

I decided that about 62 inches long on deck and 48" wide would cover the opening and bring it back to about the forward cockpit bulkhead where it could be joined with a dodger/aft pilothouse structure.  The steering station would be mounted (tentatively) on this bulkhead.

Without the formality of making a CAD drawing of the boat and proposed structure (s), I decided to make this first section slope back from the front and slope in from the sides.  Along with ensuring drainage around (to be added later) fixed or opening windows, it avoided this enclosure simply being a big fiberglass box perched on the deck.

I made a quick test structure using 1/2" PVC structural foam, but judged that it would be too flimsy and hard to work with.  So, I layed out the dimensions and began to construct using 21mm Core Cell foam.  This was the new M80 Marine Grade and was a great choice. This thickness is just shy of 13/16" and would provide both the strength I needed and relatively light weight.

This foam was very nice to work and cut.  After drawing a line to represent the cut area, three or four passes with a razor knife was adequate for it to be snapped cleanly with no need for doing any cleanup to the edges.

To give me the required slope, I cut the foam for the front to 44" at the top and left 48" at the bottom.  This gave me a side with about a 7 degree from vertical slope.  Since the sides would only be about 20" tall, this amounted to an almost 1" per 1' cant in for the sides.  I cut the sides in from vertical 4" at the top which made the forward section lay back about 15 degrees.


Front is canted in 4" from vertical over the 20" height.  Sides are canted in 2" from vertical over the same height.


From the experience with the test panels, I decided to glass this foam and make construction boards to be assembled when all surfaces of the front and sides were rigid composite structures.

Using West System Epoxy, I layed up the Saertex stitched cloth which consisted of 3 layers:  One of CSM (chopped strand mat) and two layers of cloth.  This is a heavy material which weighs about 37 oz. per yard.  One well wetted layer of this on both sides yielded a very strong (and mostly board rigid) panel that was very light weight.

Since this was doing to be the permanent interior of the cabin top in the center, I decided to build "roof ribs" to add strength and allow wiring to be inserted.  A removable panel of headliner material will be secured to the flat underside of the ribs.


The Roof Ribs were made the inside width and then cut on the ends to match the slope of the sides.  With an overall height of 3 1/2" and height at the sides of 2" this gave a slope 3/4" per foot for adequate draining on the roof. The foam was encased in fiberglass cloth on three sides with the top section left open for attaching the roof panel with epoxy at a later step.
Construction was amazingly easy as the fiberglass "boards" were set up on a lofting jib on the top of a 4'x8' sheet of OSB.  I screwed cleats in four locations so that the sides could be supported.  This was necessary because the bottom width would be exactly the same width as the "table" making it very easy for the side to slip off while panels were being assembled.
The front was attached (without any epoxy) using 2 1/2" deck screws.  Each Roof Rib (note screw heads shown) was attached with West System 610 Epoxy.  This made the initial assembly very easy:  Each Roof Rib was laid on side side and the end got a heavy coating of 610 squeezed out with a caulking gun.  Once the epoxy was added, the rib was secured with one screw - to be removed after everything was dry and cured.
When the epoxy was cured from the attachment of the Roof Ribs, the front was attached using a thickened West System epoxy.  

Thursday, November 24, 2016

What is this project? What are we doing to this boat? Is it for sale?

What is this project?


In the simplest of terms, this project will convert an incomplete sailboat into a complete power boat that is not only well-equipped but uniquely suited to making a trip around The Great Loop.

After initial cleanup and removal of all pieces that need restoration or to be scrapped, we will make a shopping list, begin construction and modification and make the complete conversion.

Since sailboat operates differently under power alone and does not have the topside weight or mast, boom and rigging, particular attention will be paid to adding any weight as low as possible and making any additions above the waterline be as light as possible.

While nearly everyone might believe that only a full displacement hull trawler is the only way to make such a trip, a sailboat hull under a modest amount of power gives the best economy in terms of overall fuel use.  While an inboard diesel might be more economical regarding fuel use, a modest sized 4-stroke outboard is more reasonably priced and possibly more economically efficient in terms of maintenance and potential breakdowns.


What Are We Doing To This Boat?


In the simplest of terms, we are preparing the best equipped, most comfortable and affordable boat for making the loop trip.

This hull was originally designed to have a pop top which was closed at anchor or in weather and then raised to give an area in the center of the main saloon (living area between main bulkhead and companionway) full standing headroom.  Instead of the pop top, we are building a cabin extension which will give full weather protection, standing headroom, forward and side visibilty and storage.  This cabin extension - really the forward portion of the "pilothouse" will be constructed of foam/fiberglass composite construction and will be solid enough to allow mounting some of the required solar panels.  The "hole" to be covered in the cabin top is about 36" by 50" and this top will be attached with a weatherproof flange that will make it about 48" wide inside and 63" long.  The interior height will be about 19" and will allow some additional storage without restricting headroom or visibility.

This cabin extension will join up with a fully-enclosed hard dodger which will give full headroom at the helm and extend aft about half the length of the former sailboat cockpit.  The aft end will have a bridge deck which will provide protection in the cockpit from following seas and will provide custom rigid fiberglass doors to provide cabin security and a fully weatherproof cockpit.  

The aft portion of the existing cockpit will be converted to a flat deck seating area with fuel tankage on the cockpit sole and water tankage between the hull. This area will also be enclosed with a soft enclosure made from Sunbrella and vinyl glass and screen panels.

We start the project by removing everything from the deck that we don't need or will reinstall, fill all the holes, paint the deck and then reinstall things like pulpits, lifeline stanchions and cleats.  Making the boat  as watertight as possible is very important!

With modifications as needed, we will install a helm on the existing bulkhead at the forward portion of the cockpit and long with a dash for instruments, controls and navigation equipment.  Comfortable helm seating will be installed on the starboard side with a seating/lounging area to port.

The outboard will be mounted on the cutaway transom and will incorporate a modified tiller autopilot to allow remote steering and holding course. The outboard will have electric start and an alternator to charge the single starting battery.

The existing wiring will be removed and replaced with all new wiring that will provide all needed functions.  The main "house" battery bank will consist of one (or possibly two) banks of four 6V golf cart batteries in series/parallel which will yield a 12 bank with a huge 460 amp hour capacity.

This will be adequate for all house loads and with the solar panel (s) and controller, will make the craft totally "off the grid" when it comes to all electrical loads - particularly for the Engel high efficiency refrigeration.

The galley will have the advantage of AC power through the use of a 2000W inverter to allow the use of a toaster, coffee pot and occasional use of a small microwave.

While the house bank will be primarily charged by the solar system, a provision will be made to allow trickle charging from the outboard's alternator and AC charging with a 3-bank onboard charger when shore power is plugged in.

An anchor windlass will be installed to make it easier to deploy and retrieve the anchor, chain and rode.

An ABYC-compliant propane locker will be built on the stern with propane safely available to power the rail mounted grill and range/oven in the galley.  Along with an electric pump for on demand fresh water use, there will be a manual pump as well.  An onboard washdown pump will be mounted to allow the boat to be cleaned as needed and anchor chain rinsed as the anchor is hauled aboard.

A permanent head will be be used with a fairly large holding tank installed below the V-berth.  Fresh water tankage will be installed aft.

Electronics will include a VHF radio with AIS, a chartplotter and AM/FM.  A small TV and DVD player will be coupled to an off-air antenna and WiFi booster for streaming delivery where possible.

Interior layout and materials will be configured as needed to accommodate the revised layout of the boat and installed features.


Is It For Sale?


Yes.  No.  Maybe.

It depends on how much is spent to meet all of the equipment and design change needs and at what stage on makes me an offer for purchase.  At the beginning (Fall of 2016) the price for the hull and trailer would only be about $1200.00.  As more work is done and equipment is added, the price would go up.  Without making a detailed budget analysis, the "bogey" for a fully-equipped looper boat, ready to go would be $10,000. to $13000.

This would be for a boat that has been over from stem to stern, with fresh paint, new electronics, new upholstery, galley equipment and a 9.9HP 4-stroke (Honda or Mercury).

The possibility of keeping it for fall trips down the rivers and a spring trailer trip home is a very real possibility unless someone wants it more than me.

If you have any interest in picking this boat up at any stage of the progress (watch this blog), please contact me at sailorman@mascom.com.


Monday, October 3, 2016

Gypsy Rose Was A Dirty Girl. She needed power washing!

Now the project boat has a name.  Actually, she had this name but I never noticed until she arrived back home on top of Murphy Mountain.

The trip from Holland, MI was relatively uneventful except for the 2 1/2 hours spent replacing a wheel bearing on the trailer.

I'm always amazed at how a heavy coat of mold can get blasted by a pressure washer and reveal a pretty hull and deck below.

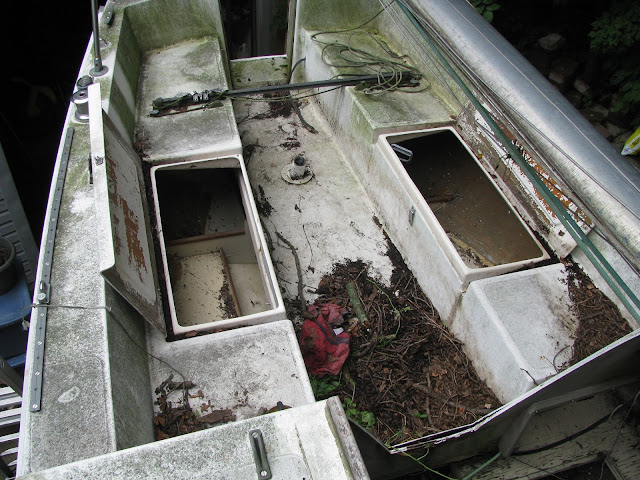
Unfortunately, the inside of the cockpit and the cabin will require a different technique since there is at least of couple of trashbags to fill with leaves, twigs and junk.


Wednesday, September 28, 2016

Cal 25 Sailboat As Looper Boat

After making a portion of the Great Loop trip on a 43' sailboat in 2015, I became fascinated with the prospect of doing it again - including lots of river side trips - on a boat particularly suited for the vocation.

While I toyed with converting an appropriate 21-25' IO boat and powering with a small, high efficiency outboard, I realized that the handling and stability of the hull would suffer greatly from the removal of nearly 1,000 pounds at the stern.  Since fuel economy is a particularly critical element, this small outboard option on a comfortably-sized hull was not feasible.

Nearly everyone who has been to the Great Loop websites (America's Great Loop or Great Loop Cruising Association) knows that you can make this trip with a variety of different types of craft, but either a diesel trawler or sailboat is the best platform.

While I have equipped my personal sailboat with nearly everything I'd need for this trip, I decided that a project boat would be a better selection for now.

With the exception of the Great Lakes, some areas of the Gulf, Florida Coast and East Coast of the U.S., there's not much of the route that lends itself to hoisting the sails.  The boat that made last year's trip was coming from the Hudson River and I met up with it in Hammond, Indiana (very near Chicago).  The skipper noted that there was only four or five days on the way from Buffalo to Chicago where the winds were favorable to travelling by sail power.  And, there were no days possible in the 1200 miles down to Mobile.  Kingston, NY to Mobile represents a full 1/3 of the loop!

A sailboat with a mast also has to contend with the complexity of carrying it, stepping it, un-stepping it, rigging it and associated costs.  The option of shipping it to Mobile was taken on this trip and not regretted.

So, what about having a low cost sailboat and not even have the mast available?  What about converting a sailboat to a long, skinny looper boat powered by a diesel or small outboard?

I selected this particular boat as the basis for this project for a variety of reasons:

  • It was very, very reasonably priced.
  • It was missing many parts, but did have some things that could be sold, including the mast, winches, sails and some sailing hardware.
  • It was trailerable.  While not trailer launch able it could still be stored on the trailer at any time it needed to be out of service and "portaged" by road on areas of the trip where it was desirable.
  • It was nearly a blank canvas.  While interior bulkheads and bilge framing was intact, nearly everything else was missing.  This will allow me to modify as I see fit without "wasting" any components.
  • It has a long companionway/hatch opening that was originally equipped with a pop-top to allow standing headroom in the main cabin.  This area can be equipped with the equivalent of a canvas pilot house.
  • It has a head and holding tank.  While it may not be serviceable as is, it can be repaired or replaced and the space is already dedicated to this use.